
Disclosure: Shhots AI is our product.
Virtual staging before and after comparisons are the fastest way to judge whether a tool is any good, because the failure modes are visible immediately once you know where to look. A bad result gives itself away in the shadows, the scale, or a wall that quietly moved.
This post walks through six real examples of the edits a listing shoot typically needs, generated in Shhots AI’s Real Estate Studio with a named preset and, where something specific had to survive, a one-line comment. Each one covers what changed and what deliberately did not. If you are new to the practice, start with what virtual staging is. At the end there is a short checklist for grading your own results before they go on the MLS.
What to look at in a virtual staging before and after
Before the examples, here is what separates a usable staged photo from one a buyer will feel uneasy about.
Shadows have to agree with the room. Every added object needs a shadow that falls in the same direction as the shadows already in the photograph, with roughly the same softness. A sofa lit from the left in a room lit from the right is the single most common tell, and once you notice it you cannot unsee it.
Scale has to be honest. The furniture is the reference object a buyer uses to judge the size of the room. Undersized furniture makes a small room look generous, which is a misrepresentation even if nobody intended it. A staged bed should be a real bed size, and it should be obvious which one.
Perspective has to match. Furniture placed on a floor plane has to sit on that plane. Legs that float, rugs that do not follow the floorboards, and tables whose edges disagree with the room’s vanishing point all read as wrong before a viewer can say why.
The structure has to be untouched. This is the one that matters legally rather than aesthetically. Compare the before and after on walls, windows, doors, floors, ceilings, and built-ins. If any of them moved, grew, or appeared, the image has crossed from staging into alteration, and that is a different conversation with your compliance officer.
The reflections have to be handled. Mirrors, glossy floors, and windows all reflect a room that just changed. Cheap staging adds a sofa and forgets that the mirror on the far wall should now show it.
Six virtual staging examples, before and after
If you would rather watch the empty-to-furnished flow than read it, this is the whole process on a real room:
1. Empty living room to staged living room
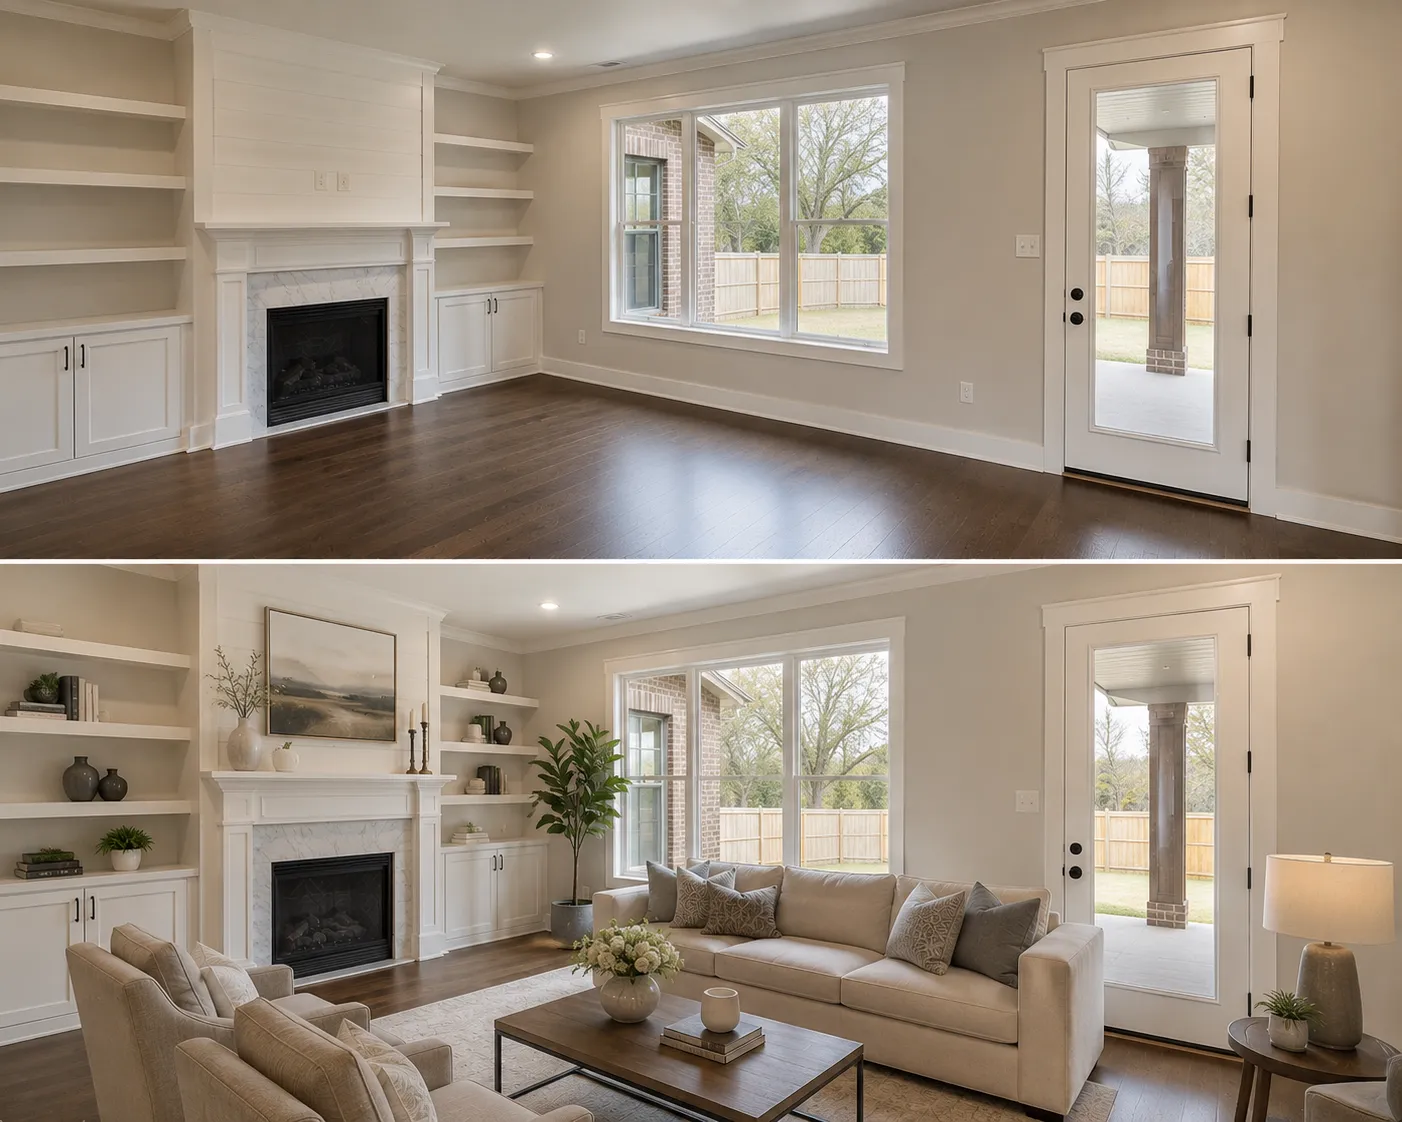
The core case, and the one most listings need. A bare living room has no reference object at all, so a buyer scrolling a portal cannot tell whether it seats four people or eight.
What changed: sofa, chairs, coffee table, rug, and wall art, with shadows matched to the existing window light.
What stayed: the window positions, the floor material and its direction, the ceiling height, and the sightline through to the next room. Put the two images side by side and every architectural line holds.
This is the shot worth running in two or three styles before choosing, because the living room is usually the portal thumbnail and it does more work than any other photo in the gallery.
2. Interior with HDR balancing
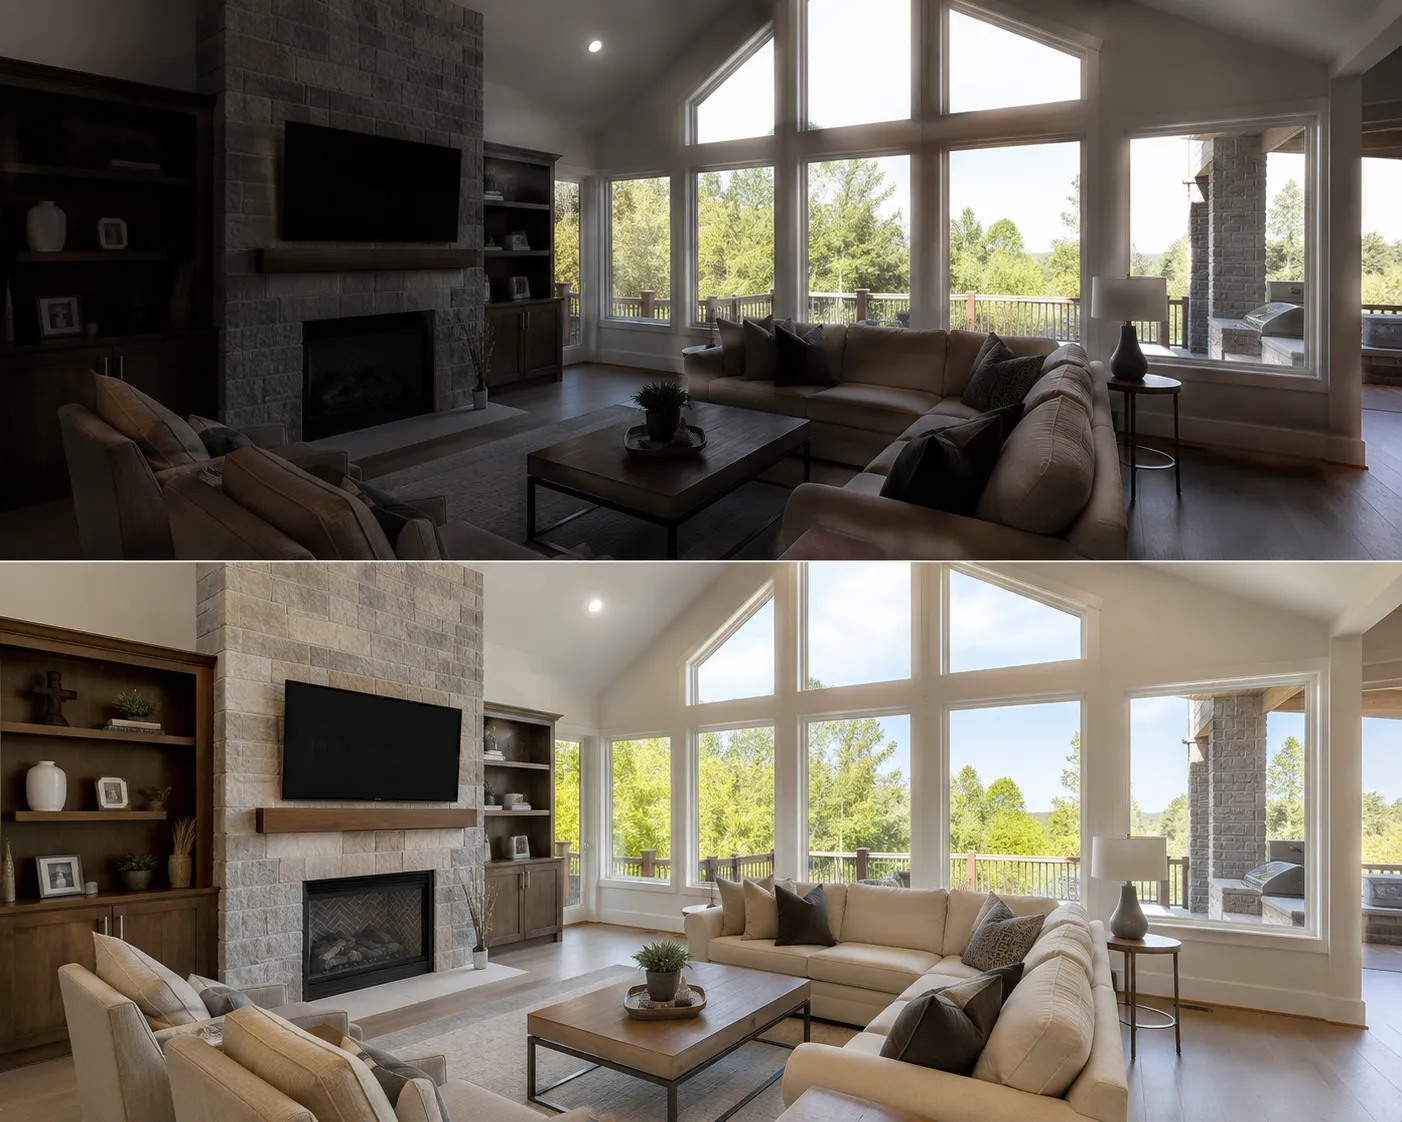
Not staging, and included deliberately because this is the step people skip.
What changed: the blown-out window recovered its view, and the dark interior corners lifted enough to show what is in them. This came from a single exposure rather than a bracketed HDR blend.
Why it belongs in a staging post: a staged room built on a badly exposed photo is a badly exposed photo with furniture in it. Correction runs first, staging runs second. The order is not a preference. Get it backwards and you will stage a room, notice the window is still white, and pay to do the whole thing again.
The correction presets are on the AI real estate photo editing page.
3. Kitchen clutter removal
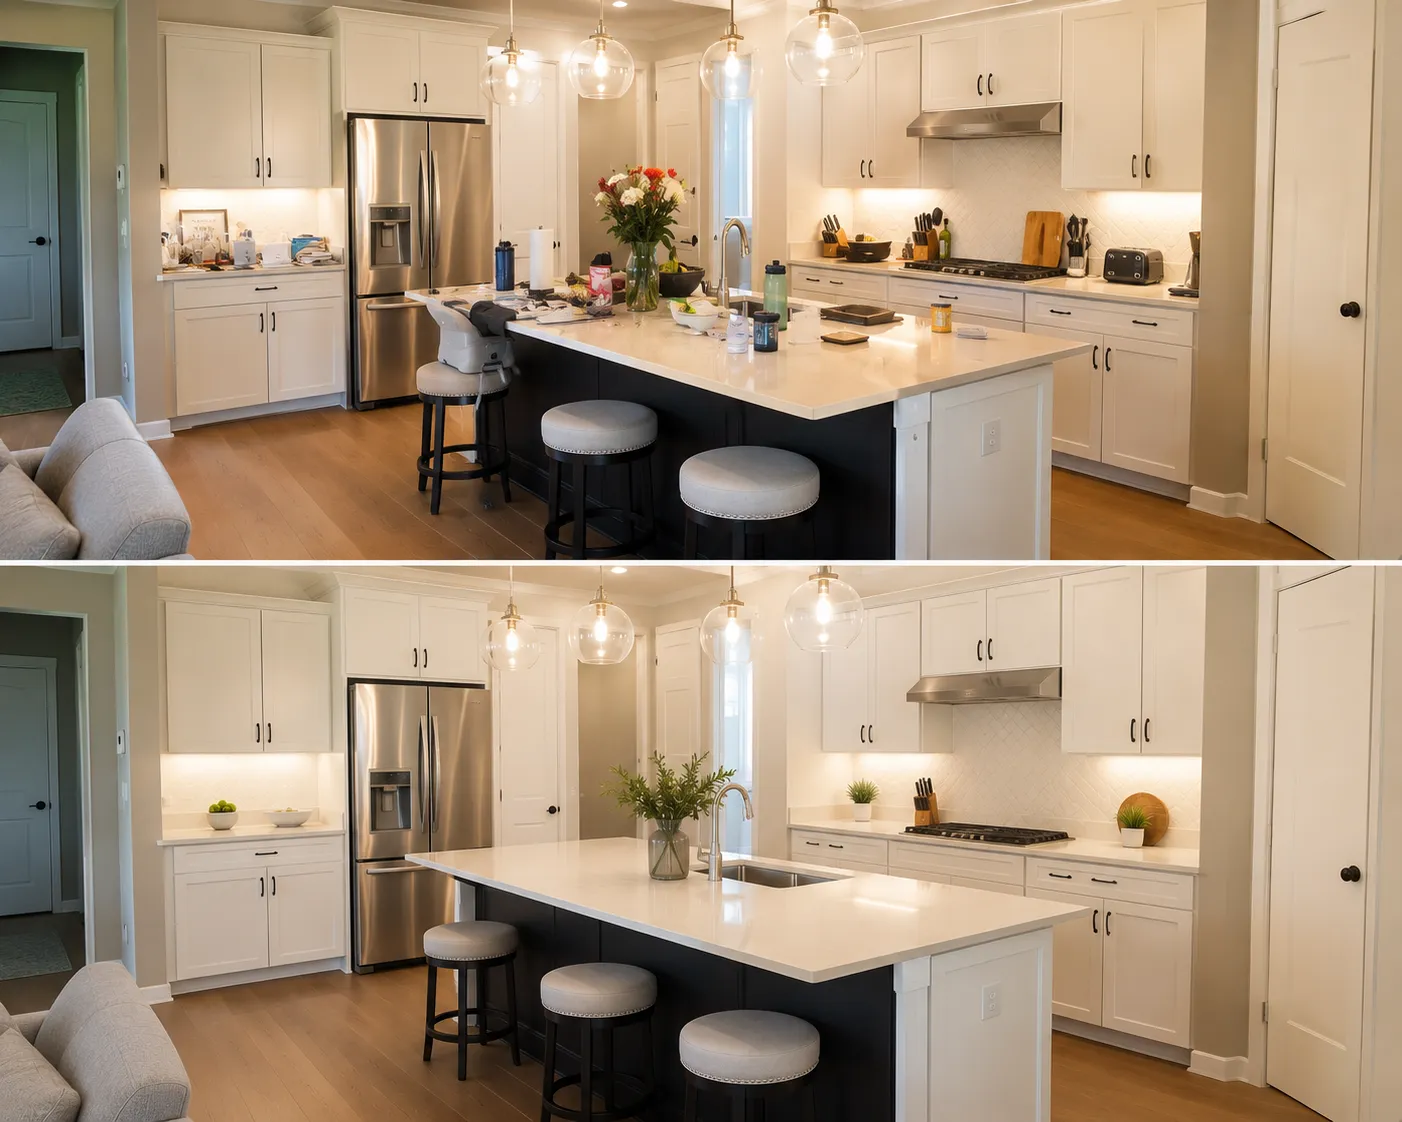
Kitchens rarely need furniture. They need the seller’s life taken off the counters.
What changed: countertop appliances, dish racks, and general clutter removed, with the surfaces behind them reconstructed.
What stayed: the cabinetry, the worktop material, the splashback, and the appliances that actually convey with the property. That last distinction matters. Removing a kettle is tidying. Removing a fitted oven is misrepresentation.
This is a removal job rather than a staging job, and it is worth knowing the difference when you are choosing a tool, because plenty of virtual staging services do not offer it.
4. Daytime exterior to twilight

Twilight exteriors are the highest-performing hero shot in most markets, and traditionally they meant going back to the property at the right hour and hoping for weather.
What changed: the sky, the ambient light on the facade, and the warm interior glow through the windows.
What stayed: the roofline, the window frames, the stonework, the driveway, and the landscaping.
Two cautions. Interior window glow implies lights are on, which is fine. And check your MLS rules on twilight conversion specifically, since a few boards treat a time-of-day change as a material alteration requiring a label.
5. Exterior sky replacement and lawn
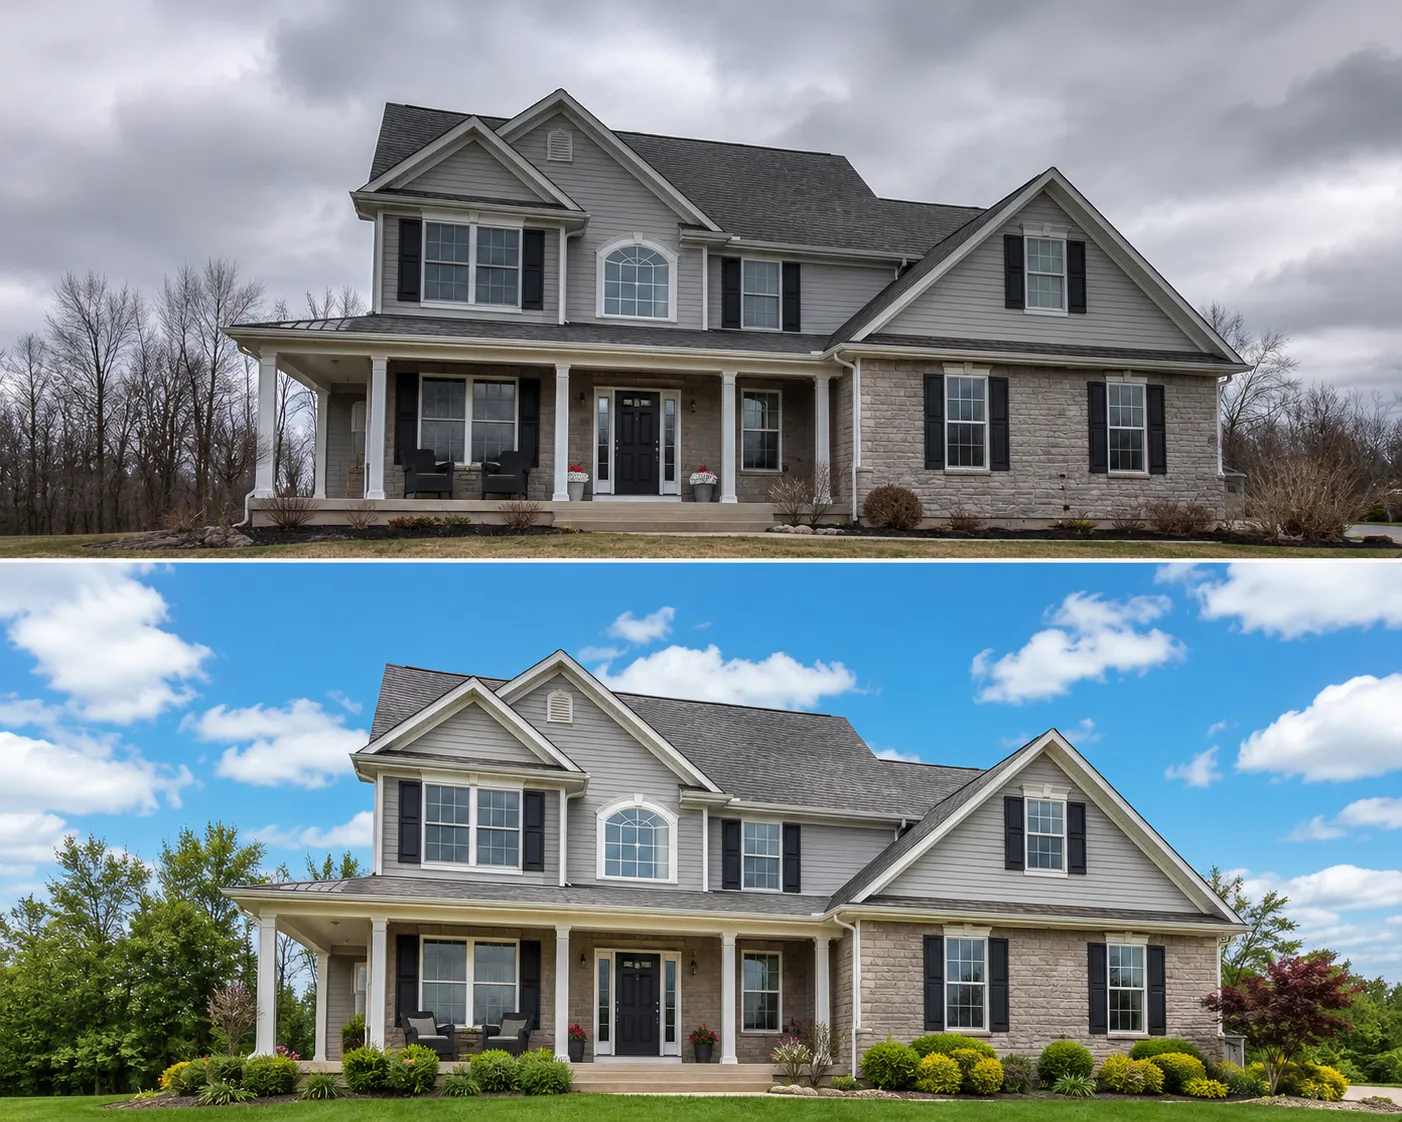
The workhorse exterior edit. A grey overcast sky flattens a property, and you cannot reshoot every listing on a good day.
What changed: the sky, and the lawn brought back to a healthy green.
What stayed: the house, the roofline, the trees and their actual shape, and the hard landscaping.
The masking around rooflines, branches, and power lines is where sky replacement usually fails. Zoom in on the edges before you publish. A halo around a tree is the giveaway that a cheap tool did the work.
On lawn greening, use judgement. Reviving a lawn that is dry from a hot week is normal practice. Turning genuinely dead ground into a putting green is the kind of edit that gets raised at a viewing.
6. Backyard and pool restoration
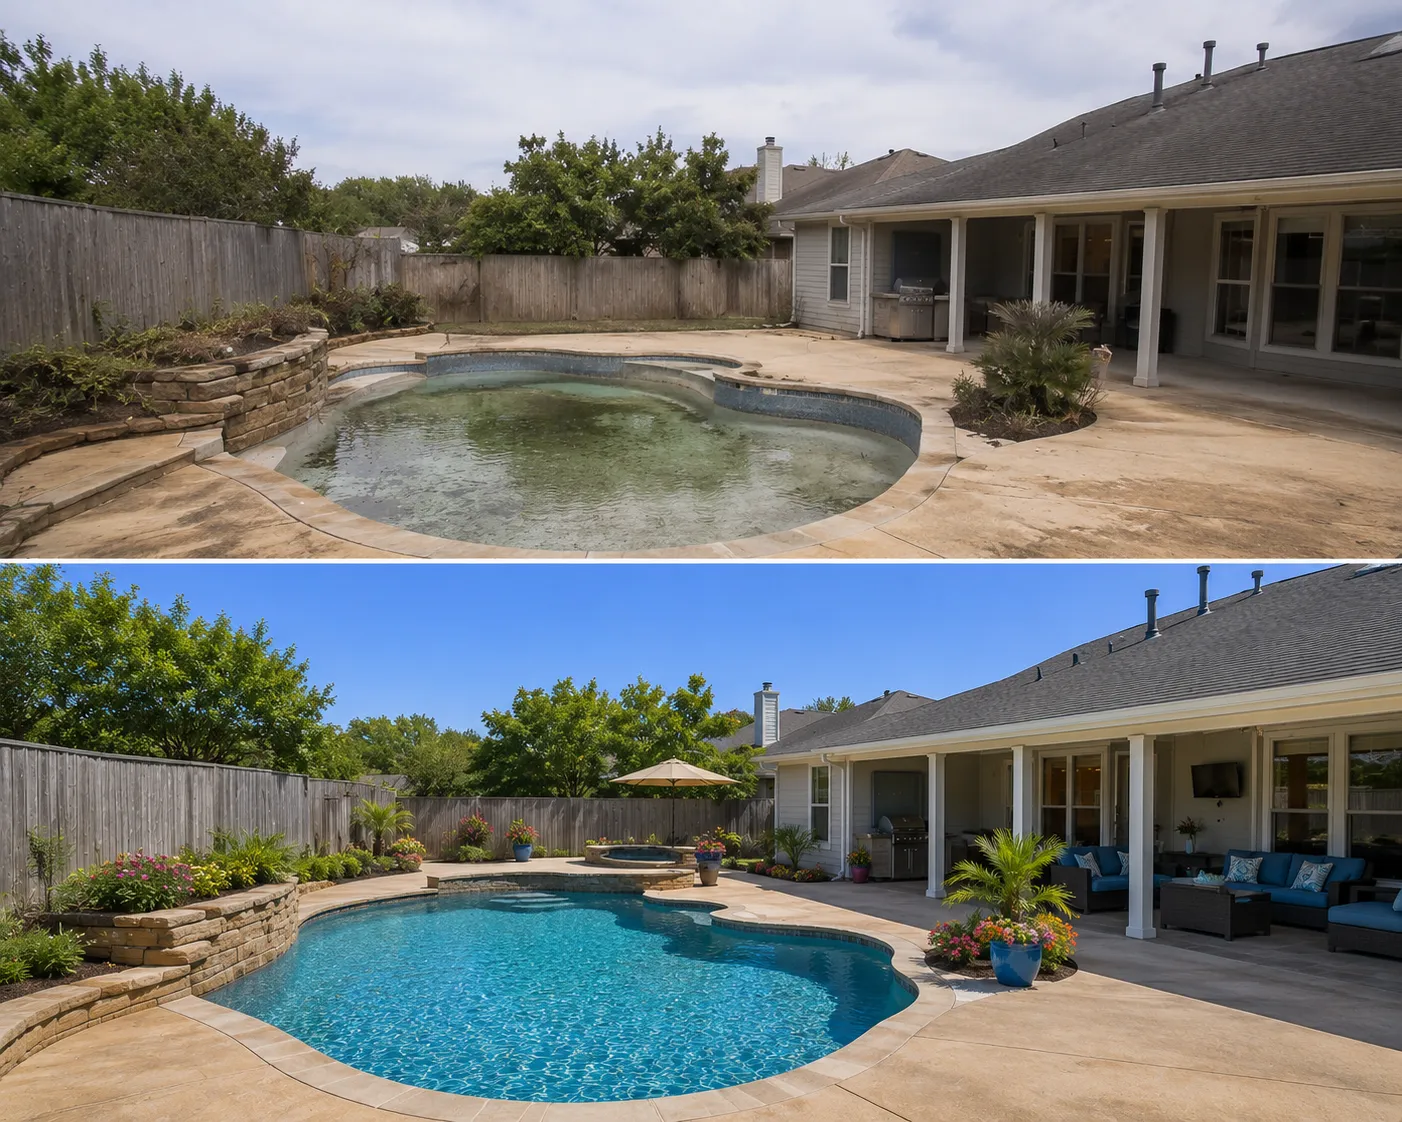
Outdoor space is a major value driver and it photographs badly out of season.
What changed: the pool water clarified and the surrounding planting freshened.
What stayed: the pool shape and size, the decking, the fencing, and the boundary.
The line to hold here is between presentation and condition. Clearing seasonal debris off the water is presentation. Making a green, unmaintained pool look freshly serviced is condition, and a buyer will discover the difference at the inspection.
What a bad before and after looks like
Four failure modes, in rough order of how often you will hit them.
The floating sofa. Furniture that does not quite sit on the floor plane. Usually caused by a perspective mismatch, and most visible where the legs meet the floor.
The impossible shadow. Added furniture casting a shadow in a different direction from everything else in the room, or casting none at all. The room reads as a collage.
The shrinking wall. The structural failure. Compare the two images at the corners of the room. If the wall moved to accommodate a bigger sofa, discard the image and change tools.
The doll’s house. Furniture scaled slightly small to make the room look bigger. This is the most tempting failure because the result looks appealing, and it is the one most likely to cause a complaint, because the buyer measures the room at the viewing and it does not match what they pictured.
How to grade your own before and after
Run this checklist on any staged image before it goes on the MLS. It takes about thirty seconds.
- Flip between before and after at full size. Anything structural that moves will jump out immediately in a flip that it will not in a side by side.
- Check the shadow direction on every added object against the light source in the original.
- Find a known object in the frame, a door or a window, and sanity check the furniture scale against it. Standard interior doors are a reliable ruler.
- Zoom to 100% on the edges where added objects meet floors and walls, and on any masking around trees or rooflines in exteriors.
- Look at every reflective surface and ask whether it should now be showing something it is not.
- Ask the viewing question. Would you be comfortable standing in this empty room with the buyer, holding this photo? If the answer is no, regenerate it.
Because a generation costs 55 credits on Shhots AI and comes back in under a minute, failing this checklist is a minor inconvenience rather than a two-day setback. At a per-image service the same failure costs a revision fee and two days, which is the argument the virtual staging cost breakdown makes in more detail. That is the practical argument for iterating: the checklist only works if rerunning is cheap.
Before and after, and disclosure
Every one of these examples needs a label on the listing.
Staged rooms need to be marked as virtually staged. Materially altered photos, which in most MLS interpretations includes sky replacement and twilight conversion, need to be marked too. NAR Article 12 in the REALTOR Code of Ethics requires a true picture in advertising, and individual MLS photo policies add their own specifics.
The practical protection is keeping the before. On Shhots AI every generation saves as a new version against the property alongside the untouched original, so producing the unedited file for a disclosure request is one click rather than a hunt through a hard drive.
The full breakdown of what to label and where is in the virtual staging rules and disclosure guide.
Turning your before and afters into a listing video
Once the gallery is corrected and staged, three or four of those finished images become a fifteen-second narrated walkthrough with an on-camera presenter. The ordering matters: use the staged versions rather than the originals, because the video is assembled from whatever stills you feed it.
Details on the AI real estate video generator page.
Presenting before and afters to sellers
The comparisons in this post are useful for judging a tool. They are also the single most effective thing you can put in a listing presentation, and almost nobody uses them that way.
A seller deciding between agents is comparing promises. Everyone says they market well. A before and after from one of your own listings is evidence rather than a claim, and it lands in about four seconds.
Three ways to use it.
In the pitch deck. Two or three pairs from properties comparable to theirs. Same property type, similar price band. A staged living room from a house across town is far more persuasive than a stock example from a software vendor.
As a live demonstration. If you have photos of their property already, staging one room during the meeting is a strong close. It costs 55 credits and takes under a minute, which means you can do it while you are sitting there.
As social content. Transformation posts travel further than listing posts, and they demonstrate competence to sellers who are not ready yet. The before and after reveal is one of the reliable formats for this.
One caution on all three. Use your own work. A before and after from a vendor’s marketing page is not evidence of what you can do, and if a seller recognises a stock image the pitch is over.
Building a before and after library
The comparisons you produce this year are an asset, and most agents throw them away by keeping only the finished file.
Three habits that cost nothing:
Keep the pair, not the result. Save the original beside the staged version for every room you stage. On Shhots AI that happens automatically, since every generation is a new version filed against the property rather than an overwrite. If you use a tool that overwrites, export the original first.
Tag by property type and price band. A before and after only persuades a seller when it looks like their house. A library sorted into condos, family homes, and rentals is far more useful in a pitch than one big folder.
Note which style you used. Six months later you will not remember whether that living room was Modern or Scandinavian, and the answer is exactly what a prospective client asks when they like one and not another.
The payoff arrives at the listing presentation, where two pairs from comparable properties do more work than any slide about your marketing process.
Virtual staging before and after FAQ
How can you tell if a photo is virtually staged?
Look at the shadows first. Added furniture that casts a shadow in a different direction from the rest of the room, or casts none at all, is the most common tell. Then check where furniture legs meet the floor for perspective mismatches, and look at mirrors and glossy floors for reflections that do not include the new objects. On a well-made staged image none of these are visible, which is why disclosure labels exist rather than relying on buyers to spot it.
Do virtual staging before and afters have to keep the room identical?
Yes. Walls, windows, doors, floors, ceilings, and built-ins must be exactly as photographed, and only furniture and decor should be added. A tool that widens a room or adds a window has moved from staging into misrepresentation, which is where the actual legal exposure sits. Flipping between the two images at full size is the quickest way to catch it.
What is the best room to virtually stage first?
The living room, in most listings. It is usually the portal thumbnail, it is the room buyers use to judge whether the property suits how they live, and an empty one has no reference object at all. Bedrooms are the second priority, because without a bed in frame there is no way to tell whether a king fits.
Should I stage before or after photo correction?
Correct first, always. Staging a badly exposed photo gives you a badly exposed photo with furniture in it, and you will pay to redo the whole thing. Fix exposure, white balance, and perspective, then stage, then build any video from the finished versions.
Can virtual staging fix a cluttered occupied room?
Yes, in two steps. Occupied to vacant mode strips the room back to an empty shell, then you stage it fresh in whichever style suits the buyer. That is a different job from removing a few objects, which is what clutter removal handles. Most listings with sellers still living in them need the first one.
How many staged versions should I generate per room?
Two or three on the rooms that matter, one on the rest. Running the living room in Modern, Scandinavian, and Luxury and putting them side by side takes a few minutes and reliably produces a better choice than committing to the first style you picked. On rooms that are straightforward, one pass is enough.
Related reading
- What is virtual staging?, the practice explained, including when to skip it
- Virtual staging cost in 2026, why iteration is only possible at one price point
- Is virtual staging legal?, what to label, and where
Where to start
Take the emptiest room in a listing you are working on now, run it through two styles, and grade both against the checklist above. It costs 110 credits and about three minutes.
Start on Pro at $49 a month, compare plans on pricing, or see the modes and styles on the AI virtual staging page.