
Disclosure: Shhots AI is our product.
How to make a real estate video used to mean booking a videographer, waiting three to seven days, and paying per property. It now means picking three listing photos, reviewing an auto-written script, and rendering. The whole thing takes about five minutes.
This guide covers both routes, and the strategy sitting above them is in the real estate video marketing guide. The fast route, which is generating a walkthrough from photos you already have, and the manual route, which still wins on flagship listings. Plus the parts that decide whether the video works: what to shoot, how to order the tour, and what the script should actually say.
How to make a real estate video: the short version
To make a real estate video from listing photos:
- Correct the photos first, because the video inherits every flaw in the stills.
- Stage any empty rooms, because empty rooms hold the viewer’s eye for three seconds in a video rather than half a second in a gallery.
- Pick three or four finished photos and set the tour order.
- Review the auto-written script and toggle off anything you do not want mentioned.
- Render, then cut a vertical version for social.
Here is that whole flow in real time, from picking the photos to the finished walkthrough playing:
The rest of this page is the detail behind each step.
Step 1: get the photos right first
This is the step people skip and then wonder why the video looks cheap.
A generated walkthrough is assembled from the stills you feed it. A blown-out window in the source is a blown-out window in the video, held on screen for three seconds instead of glanced at in a gallery. Video is less forgiving of bad source material than a photo grid, not more.
The correction pass that matters most for video:
- Exposure and HDR. Recover the blown-out windows and lift the dark corners. Interiors shot against daylight are the most common problem and the most visible one in motion.
- White balance. Mixed indoor lighting leaves a colour cast that becomes obvious when the video cuts from one room to another with different casts.
- Perspective. Wide-angle interiors produce converging verticals. In a still they read as a style choice. In a video with camera motion they read as a mistake.
- Clutter. Anything on a counter that you would not want held on screen.
All of that runs through named presets on the AI real estate photo editing page. A twenty-photo shoot takes about twenty minutes.
Step 2: stage anything empty
An empty room in a photo gallery gets skipped. An empty room in a video sits on screen for three seconds with a presenter talking over it, and there is nothing for the viewer to look at.
If the listing is vacant, stage the rooms that will appear in the video before you build it. If staging is new to you, what virtual staging is covers the ground rules first. Virtual staging costs about $0.45 an image and comes back in under a minute, so it is not a scheduling problem.
One rule: use the same style across every room that appears in the video. A Coastal living room cutting to a Farmhouse bedroom reads as two different houses, and in a fifteen-second cut the viewer sees them four seconds apart.
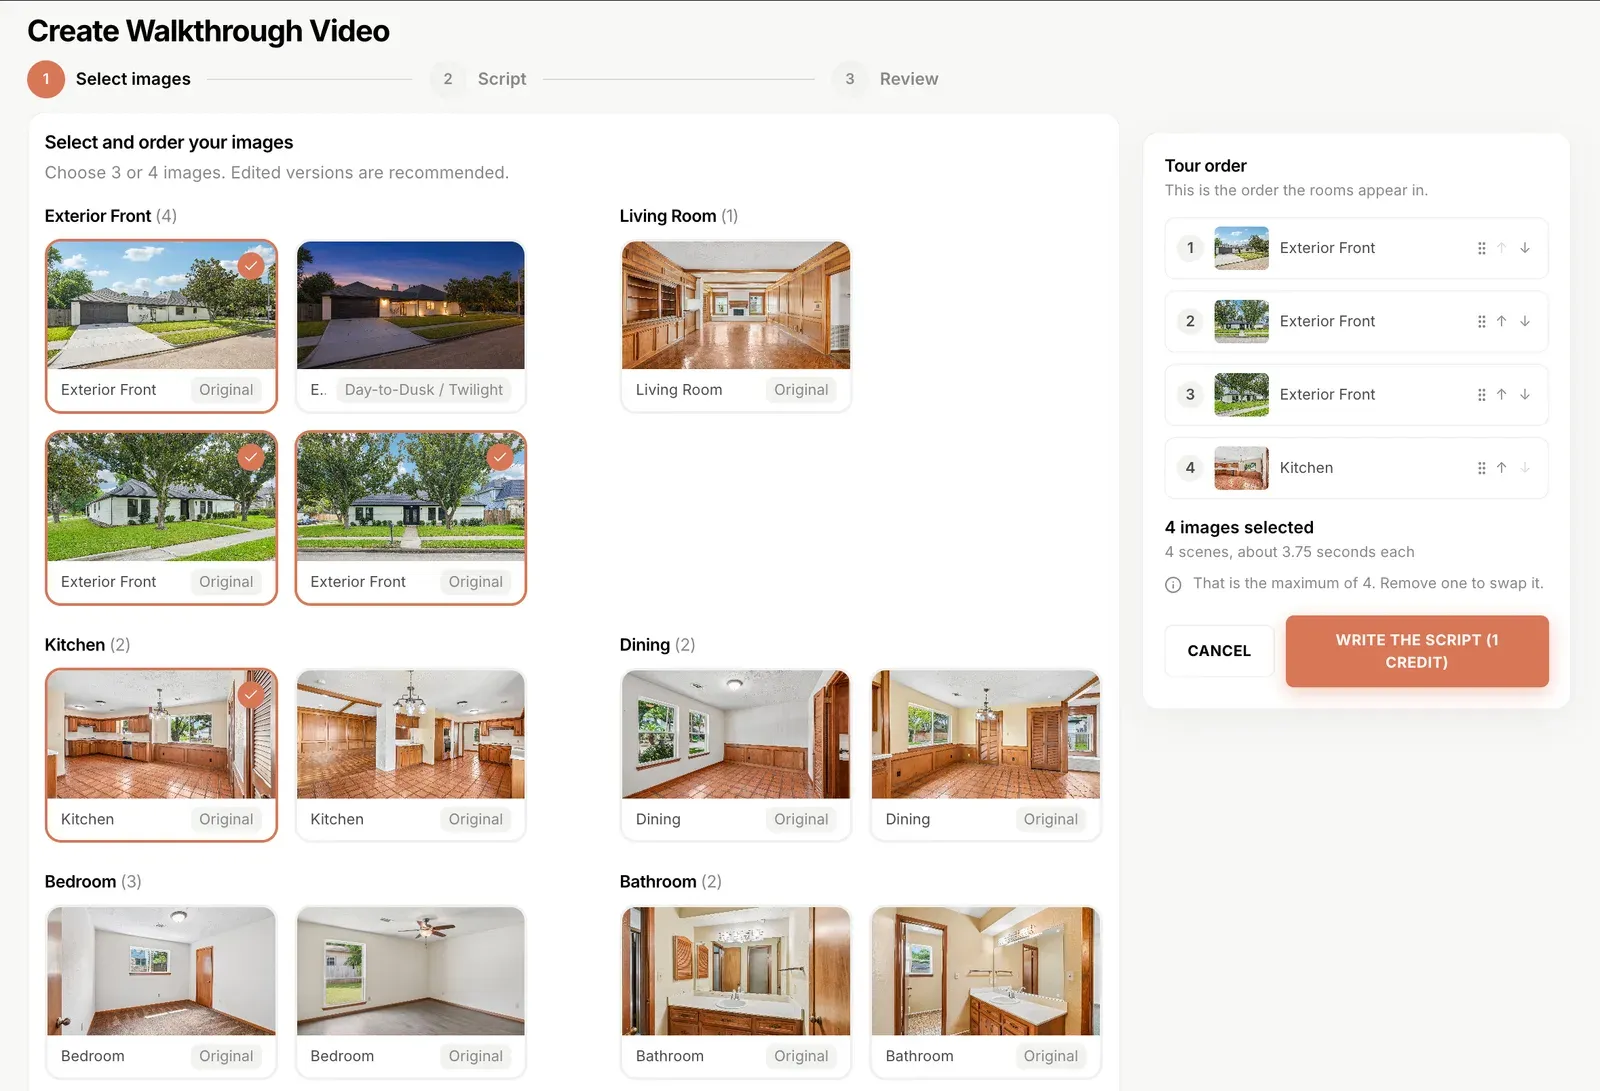
Step 3: pick and order the photos
Three or four images is the working number for a fifteen-second walkthrough. Fewer and the video feels thin. More and each shot gets under three seconds, which is not long enough to register.
Which photos. Take the strongest room, the kitchen, the primary bedroom, and one exterior or outdoor shot. That covers what buyers actually filter on.
What order. Convention says start at the front door and walk through in the order a visitor would. Attention says something different. On a social feed you have about two seconds before the scroll decision, so lead with whatever is genuinely best about the property.
If the kitchen is the reason this house sells, open on the kitchen. The exterior can close the video instead, which also gives the viewer the address context at the point they might act on it.
Make more than one cut. This is the habit that separates people getting results from people ticking a box. Build an exterior-led cut for the portal, a kitchen-led cut for Instagram, and a price-led cut for the brokerage page. Same gallery, different order, a few minutes each.
Step 4: the script
On Shhots AI the script is written from the property record you already filled in, for 1 credit. Address, beds and baths, price, and agent name arrive automatically because they are already on the listing.
Four toggles control what gets said. Switch price off on a listing where the number is not public and the presenter will never mention it. Switch agent name off for a brokerage-branded cut.
Every line stays editable up to 1,800 characters, and what you see in the editor is exactly what the video model receives. That last part matters, because it means you can fix a claim rather than hoping the render softens it.
What a fifteen-second script should contain
There is room for roughly forty words. Spend them like this:
- A hook, about four words. Something specific to this property. “Four bedrooms on a corner lot” beats “welcome to this beautiful home”, which says nothing and burns your two seconds.
- Two or three concrete facts. Beds, baths, and the one feature that makes this listing different.
- Location context. The neighbourhood, or the address if it is public.
- A single call to action. One. Book a viewing, or see the full gallery. Not both.
What to leave out
- Adjectives with no content. Stunning, gorgeous, must-see. They occupy words and add nothing.
- Any claim the photos do not support. If the script mentions a garden office, the video needs to show it.
- Prices that are not public yet.
- Anything about the neighbourhood’s demographics, schools framed as a value judgement, or anything else that touches fair housing. This is the one place where a generated script needs a human read before it goes out.
Step 5: render, then cut for vertical
Walkthroughs render in 16:9, which is what listing portals, YouTube, brokerage sites, and email embeds expect.
Presenter tools are compared in AI avatar tools for real estate walkthroughs if you are choosing between platforms.
Vertical is a separate job. For Reels and TikTok:
- Run individual listing photos through image to video to add camera motion, then assemble.
- Or use the AI video generator for a multi-clip vertical edit.
- Add burned-in captions with the caption generator before posting, because most social viewing happens with the sound off. A walkthrough with a presenter and no captions loses most of its script.
How to make a real estate video the manual way
The generated route does not cover everything. Here is when to book a videographer and what to tell them.
Book a shoot when the property is genuinely exceptional, the layout needs continuous motion to make sense, there is land or a view that stills cannot convey, or the listing is high-value enough that the video is part of the pitch you made to win it.
If you are filming yourself, the shortlist that actually matters:
- Stabilisation. A gimbal, or at minimum a phone with good stabilisation. Handheld footage of interiors is the fastest way to look amateur.
- Move slowly. Slower than feels right while you are filming. It always looks faster on playback.
- Shoot wide, and level. Interiors need a wide lens and a level horizon. Tilted verticals are the most common self-shot error.
- Light for the windows. Either shoot when exterior light matches interior light, or accept the windows blowing out and fix it in post.
- Record room tone. Even if you plan to voice over, ambient audio makes the cut feel real.
Cost. A listing videographer typically bills several hundred dollars per property with a three to seven day turnaround. The full comparison is in videographer cost versus AI video tools.
Where each cut goes
| Cut | Format | Length | Where |
|---|---|---|---|
| Exterior-led walkthrough | 16:9 | 15s | Listing portal, brokerage site, email |
| Kitchen or hero-led | 9:16 | 15s | Instagram Reels, TikTok |
| Price-led | 16:9 | 15s | Paid social, brokerage page |
| Full tour | 16:9 | 60s+ | YouTube, flagship listings only |
The first three take minutes each once the gallery is finished. The fourth is a shoot.
How often to post
Every listing, on the day it goes live. That is the answer, and it only became possible when the cost of a video dropped to minutes.
The old constraint was economic. Video cost enough that agents rationed it to the top ten percent of listings by value, and everything else got a photo gallery. That split existed because of the price of a videographer, not because buyers of mid-market homes did not want video.
Listing portals now surface properties with video above properties without. A listing that goes live with a walkthrough on day one captures the burst of attention every new listing gets. One that gets a video added on day five has already spent it.
Common mistakes
Making the video before finishing the photos. Covered above, and it is the most expensive mistake because you have to redo the whole thing.
Starting at the front door out of habit. The front door is rarely the best thing about the house.
Making one cut and posting it everywhere. A 16:9 video posted to Reels gets letterboxed and looks like it was made for somewhere else, because it was.
Skipping captions. Most social viewers have the sound off. A narrated walkthrough with no captions is a slideshow to most of the people who see it.
Letting the script make claims. A generated script writes from a property record, and a property record can be wrong or incomplete. Read it before you render.
Forgetting disclosure. If the rooms in the video were virtually staged, the video needs the same label the stills need. NAR Article 12 in the REALTOR Code of Ethics requires a true picture in advertising, and most MLS photo policies extend to listing video.
How to make a real estate video that passes review
Six things worth confirming while the render is still free to change. It takes about a minute and saves the awkward version of this, which is spotting the problem after the listing is live.
- Every photo in the cut is a finished version. Not the original. This is the most common mistake and the most annoying to fix afterwards.
- The staging style is consistent across every room appearing in the video. Mixed styles read as mixed properties.
- The script makes no claim the photos do not show. Read it once as a buyer rather than as the person who wrote the listing.
- The price toggle matches reality. Off if the number is not public.
- Nothing in the script touches fair housing. No language about who the neighbourhood suits, no schools framed as a value judgement. This is the check that matters most and the one most likely to be skipped.
- The opening frame works as a static thumbnail. Most viewers see it before they see any motion.
What to do with the video after you render it
Rendering is the middle of the process rather than the end, and this is where most of the value gets left behind.
Publish it with the listing, not after. The portal video slot should be filled when the listing goes live, because new listings get a burst of attention in the first seventy-two hours.
Send it directly. A fifteen-second file sent over WhatsApp or email to your buyer list gets opened far more reliably than a link to a gallery. This is the most underused channel available to most agents and it costs nothing.
Post the vertical cut the same day. With captions.
Keep it for the seller pitch. Videos from past listings are the strongest evidence you have when a prospective seller asks how you would market their property.
Note which opening you used. After ten listings you will have a real read on whether exterior-led or interior-led performs better in your market, which is worth more than any general advice.
How to make a real estate video for a vacant listing
Vacant properties are the case where the generated route pulls furthest ahead, and they need one extra step.
An empty room on screen for three seconds with a presenter talking over it gives the viewer nothing to look at, which is worse in video than in a gallery because the viewer cannot skip past it. So the sequence changes slightly:
- Correct the shoot as normal.
- Stage every room that will appear in the video, in one consistent style.
- Build the cut from the staged versions.
- Label the video as containing virtually staged rooms, the same way you label the stills.
That fourth step is the one people forget. A walkthrough assembled from staged photos is showing furniture that is not in the property, and the disclosure obligation follows the furniture rather than the format.
The alternative, which is filming a genuinely empty house, produces a video that accurately shows an empty house. That is honest and it does not sell the space, which is why staging first is the standard approach rather than a shortcut.
Real estate video FAQ
How do you make a real estate video?
The fast route is to correct your listing photos, stage any empty rooms, pick three or four of the finished images, review an auto-written script, and render a fifteen-second narrated walkthrough. That takes about five minutes per cut on a tool built for listings. The manual route means booking a videographer or filming yourself with a gimbal, which produces a better film on an exceptional property and costs several hundred dollars and several days.
Can you make a real estate video without a camera?
Yes. Three or four listing photos are enough to generate a fifteen-second narrated walkthrough with an on-camera presenter. Since you already have photos for the gallery, no additional shooting is needed. The quality ceiling is set by your stills, which is why correcting and staging them first matters more than anything else in the process.
How long should a real estate video be?
Fifteen seconds for social and portal previews, and sixty seconds or more only for flagship listings on YouTube. Short narrated overviews get watched to the end, while room-by-room deep tours lose viewers before the kitchen. Treat the short cut as a trailer whose job is earning the click into the full gallery.
What should a real estate video script say?
In fifteen seconds you have about forty words. Spend them on a specific hook, two or three concrete facts such as beds, baths, and the standout feature, the location, and one call to action. Cut every adjective that carries no information, and cut anything the photos do not actually show.
What is the best order for the rooms in a listing video?
Lead with the strongest room rather than the front door. On a social feed you have roughly two seconds before the scroll decision, so opening on the feature that sells the property beats opening on the entrance out of habit. Close on the exterior, which gives address context at the moment a viewer might act.
Do I need different versions for Instagram and listing portals?
Yes. Portals, YouTube, and email want 16:9, while Reels and TikTok want 9:16, and a 16:9 video posted vertically gets letterboxed and looks misplaced. Making a second cut takes a few minutes from the same gallery, and vertical cuts should carry burned-in captions since most social viewing happens with sound off.
How much does it cost to make a real estate video?
A generated walkthrough costs 1 credit for the script plus the render, from the same pool as photo editing and staging, on plans starting at $49 a month. A listing videographer typically charges several hundred dollars per property with a three to seven day turnaround. The honest comparison is coverage rather than quality: one excellent video on ten listings, or a good video on all of them.
Related reading
- Real estate video marketing guide, where each cut goes once it is rendered
- AI avatar tools for walkthroughs, which presenter platform to use
- Videographer cost vs AI video, when to book a shoot instead
Where to start
Pick a listing that already has photos. Run the shoot through correction, stage whatever is empty, then build one exterior-led cut and one kitchen-led cut and post them to different channels. Total time is under half an hour and you will have a direct read on which opening works for your market.
Start on Pro at $49 a month, compare plans on pricing, or see the script editor and toggles on the AI real estate video generator page.